High-Class DIY Crystal Chandelier
- thick wire
- 9 small rings
- small hooks (or other method of attaching to ceiling)
- small chain
- strings of crystal (whatever color or shape you please, I used these)
- thin craft wire
- glue gun and glue sticks
- strong glue
- measuring tape
- painter’s tape
- pliers
- wire cutters (if your pliers don’t have them build in)
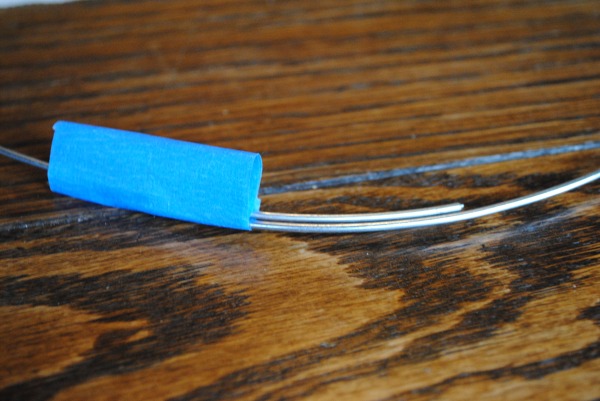
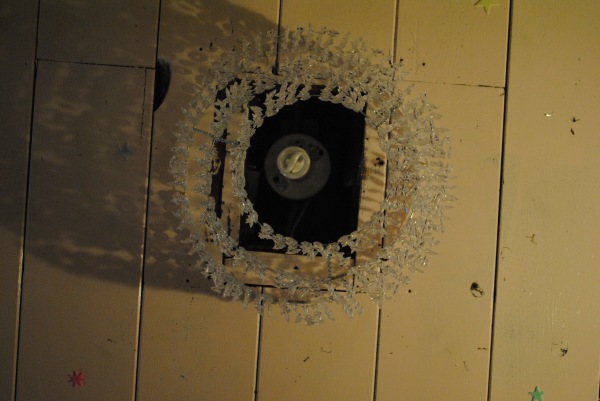
I started the process by measuring the hole in the ceiling. I wanted a round fixture that went all the way around the hole, so my largest ring has a 16″ diameter. The second and third rings have 12″ and 8″ diameters. I bought some basic wire at the hardware store, measured out enough to make all 3 rings, and cut them. Then I shaped each length of wire into a circle, threaded on 3 of the small rings onto each (for attaching the large rings together later), and secured the seam with painters tape. Put just enough painters tape so the wire stays in place, leaving room to secure it more permanently. I doubled wrapped some craft wire around the seam, and then used Gorilla Glue to secure it (in case you haven’t used Gorilla glue before, apply it sparingly. It expands a lot). While the rings were drying I cut the crystals into 7″ lengths. After the glue dried I removed the painter’s tape and cut off any extra wire.
Once the large rings dried, I measured out how far apart the small rings should sit, and marked their place with painter’s tape. To do this I measured the circumference of the rings, then divided that by 3 so they would be evenly spaced. Then I used the glue gun to attach the crystal strings. I put a dab of glue on the 2nd crystal, flipped the top crystal over the wire, and pressed the 1st and 2nd crystals together to secure them. I added a small dab of glue where the crystal string and wire met to prevent it from sliding around too much. Brendan ingeniously created the wine bottle holder to keep the ring elevated while I glued. It’s just a wine bottle, a cork with an X cut in the top, and string threaded through the X with S rings on the ends.
After crystals were glued around all 3 large rings, I used 3.5″ lengths of chain to attach them. During this process some of the crystal strings dislodged, but I just spaced them out again after it was hung. Since my fixture needed to be snug to the ceiling, I just screwed 4 small hooks directly into the ceiling and hung the chandelier by the top large wire ring.
This method could easily be changed to make a fixture with a different shape or number of tiers. There are also many different ways you could hang the crystals. I wanted them to fall straight down, but they could be draped or looped, or different lengths. My chandelier may not be the nicest materials or best possible construction, but it serves its purpose well and turns an ugly hole that bothered me daily into a high-class light fixture that makes me smile. I love when design defies the logical and serious, and instead brings some silly joy into everyday life.

Loop thin wire around the seam, then twist to make double thick wire and wrap that to secure the large ring.

Add a small dab of glue to the area wrapped in thin wire.


I absolutely love it!!!
Chandelliers can be so expensive!!
I might give this a go thanks for all the info!!!!
Glad you liked it! Let me know how your try goes!
I finished it 2 weeks ago and i think it looks great! I wanna post a picture of it but dont know how =/
You should post a photo online (like on flickr or tumblr) and then post the link here! I would love to see it!
That is gorgeous. I saw a chandalier like it in a lighting store. Beautiful work. It is so glamorous.
I will do that as soon as i get an account =p
Love it!!
OK i finally got a flickr account here it is ……tell me what you think! i added some diamond shaped rhinestones to the last tier of the chandelier
http://www.flickr.com/photos/sweetglitz/7743237116/in/photostream
This is FANTASTIC! Love the diamond detail!
Thanks =D
did you use just one “curtain garland” ? the one that is $19? or would i need more than that? also about how long did it take you to make this chandelier? it is gorgeous
Yes, I just used one of the $19 garlands. That was exactly enough for the ring size/tiers/crystal length I made. If you plan to do more than 3 tiers and/or longer strands of crystals, another garland would be necessary. This took me about an afternoon to complete. The longest part is letting the glue on the rings dry (and make sure they do before you start adding crystals!). The cutting of crystal strands and subsequent gluing took a couple hours. If you make your own please post a picture! I would love to see it 🙂 -Tori
Love this so much! Thinking about using this technique for our wedding centerpieces. How wide was your largest outer ring? I’m trying to guess how many strands of crystals we’ll need – I saw that you cut the strands to 7″ each but I can’t tell from the picture how big the outer ring is.
The largest ring has a 16″ diameter. The second and third rings have 12″ and 8″ diameters. I hope this helps! Send me a photo of the finished product if you can! Tori
This is gorgeous and what a GREAT idea!! I am going to HAVE to try this!!! Thank you for sharing!!
About how much was this project?
Hi Kimberly! Depends on how many of the supplies you already have on hand. If you’re just buying the crystals, chain and wire (and make it the same size as I did) it is about $30. If you need to buy glue, wire cutters, etc., or make a larger chandelier it could be upwards of $50. – Tori
I love it! I might try to make one, but instead of wire circles, I might just use 3 different sized embroidery hoops (the inside hoop…not the outer one with the medal thingy on it!). Could paint the hoops then a white, or silver, or whatever color might coordinate with the room you’re using it in.
That’s a great idea! If you make it definitely post a photo of how it turns out!
So love this. Have a wedding to do and looking for an inexpensive chandelier thank you, will make this one for sure
Awesome! Send along some photos if you do!
LOVE your chandelier ! Great job, I want to try one.
I think I would have painted inside the square hole white or covered with a ceiling medallion so it wouldn’t detract from the beautiful chandelier you made.
Love this….I am planning on making it for my wedding. Was wondering where you got the bead curtains? I live in Canada and am hoping to find something similar at a reasonable cost.
The link to the crystal strings is in the supplies list in the post! Not sure if they ship to Canada though. Good luck!
OMG you are wonderful for sharing this!! I have been searching for one to purchase but I am a DIY freak so knowing that I can do it myself excites me so much more!! Question….how did you connect the three rings with the small link chain?
also where can i purchase the crystal strands?
The link to the crystal strands I used is in the post above!
Hi! I used a link chain that you can bend to open up the links. I used pliers to open them up and attach.
I love it and it’s just what I’m looking for to add some bling to the ceiling lights in my family room! I’ll do it tomorrow!
Just thinking about your walls… Ever thought of painting them white or gray to enhance the sparkle and elegance of the chandelier?! Or going for a restoration hardware look with gray/brown “reclaimed” wood walls? And a big fluffy white comforter on the bed and maybe a white furry rug on the floor? ! Just dream in’!
Thanks for the helpful step-by-step info! It’s great!
This was a rental house I lived in many years ago where I wasn’t allowed to paint…but your suggestions would have made that room fit for a queen! My current room is much brighter. 🙂
Beautiful…How did you attach it to the ceiling light?
The ‘ceiling light’ was more like a box cut into the ceiling with a bare bulb. I screwed a few cup hooks (like these) into the ceiling and rested the top ring in those.
hi,
it’s amazing. i am looking for a link in aliexpress for the same crystal but i can’t find. can you help me please??? i will apreciate your help very much.